
How To Create Custom GTA IV Animations In 3ds Max
Introduction
In recently times, thanks to OpenIV, a GTA IV achive exploring tool, we have been able to export GTA IV animations to text 'based' formats.
There has been numerous people who have helped create tools for 3ds Max in order to be able to interprit those files. A few off the top of my head is GIMS/GIMS Evo IV by 3dommer, OFIO by Alexander Blade and Andrew's OAD Exporter.
Obviously, you will need OpenIV, 3ds Max and GTA IV PC, believe it or not.
Downloads:
OpenIV - Required
3ds Max - Required
OFIO - Required/Optional
Andrew's OAD Exporter - Required/Optional
Animation Rig - Optional
RGS GTA IV Char Helper - Optional
RGS C.A.H.T v1.1 - Optional
Changes:
I have added 'Open Floater' to RGS GTA IV Char Helper, so you can access the buttons even when you are not on the utilities tab/menu.
Some of these tools have let us import not only Animation files (.onim) but many others, including, [Fragment Objects .oft], [Drawable .odr], [Drawable .odd], [Bound .obn], [Bound .obd] and [Navmesh .onv].
In this tutorial, I am going to be showing you the best and easiest way to create animations in 3ds Max.
For this tutorial, I am assuming you don't have Kinect 1.0/2.0 for windows which is a brilliant way to make realistic human like movements. If you do, check out iPi Studios and iClone, if you don't, continue reading...
Installing the 3ds Max Import/Export Tools
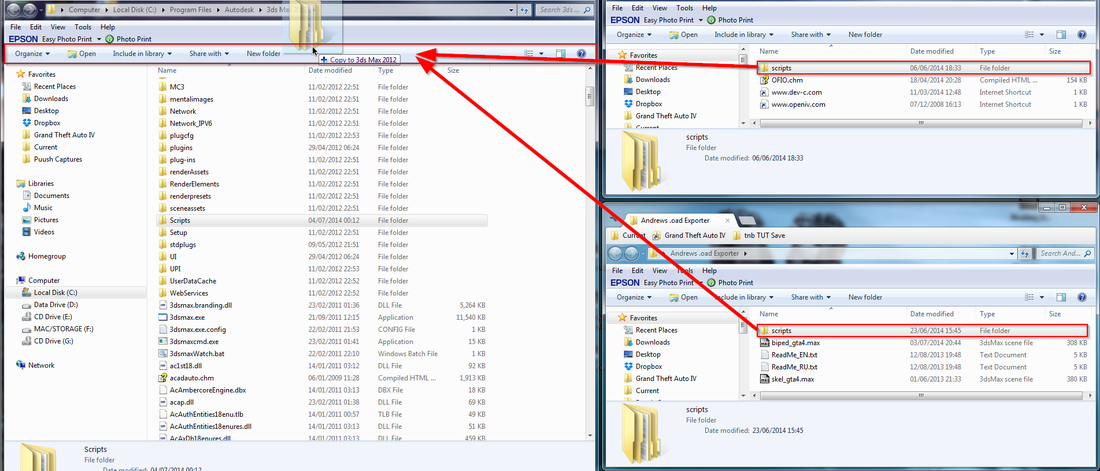
After you have downloaded, Installed and pointed OpenIV to your GTA IV main directory, Install 3ds Max, Andrews OAD Exporter and OFIO.
To install OFIO and Andrew's OAD Exporter, simply drag the included 'scripts' folders into your main 3ds Max directory.
Main directory is: C:\Program Files\Autodesk\3ds Max 2012 (Or your version of 3ds Max)
So just drag both into the main directory of 3ds Max.
To install OFIO and Andrew's OAD Exporter, simply drag the included 'scripts' folders into your main 3ds Max directory.
Main directory is: C:\Program Files\Autodesk\3ds Max 2012 (Or your version of 3ds Max)
So just drag both into the main directory of 3ds Max.
I created a little fix for OFIO and Andrew's OAD Exporter that will automatically select the root bone and also auto choose the optimisation for OFIO without the query box popping up, you can download it here, full list of alterations comes with the download.
Just extract and drag 'Scripts' with replace files to here to: C:\Program Files\Autodesk\3ds Max 2012
(Or to your version of 3ds Max).
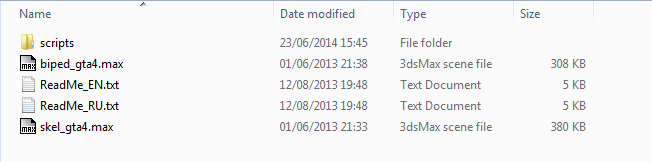
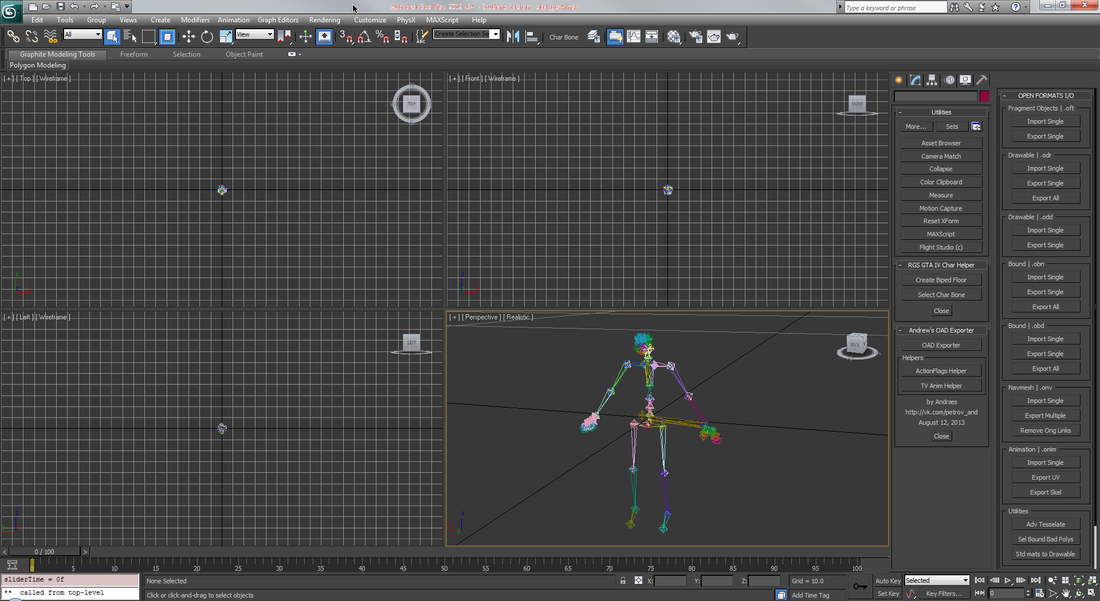
Inside Andrew's OAD Exporter, you will have two '.max' files, biped_gta4.max and skel_gta4.max. Open the biped_gta4.max.
Just extract and drag 'Scripts' with replace files to here to: C:\Program Files\Autodesk\3ds Max 2012
(Or to your version of 3ds Max).
Inside Andrew's OAD Exporter, you will have two '.max' files, biped_gta4.max and skel_gta4.max. Open the biped_gta4.max.
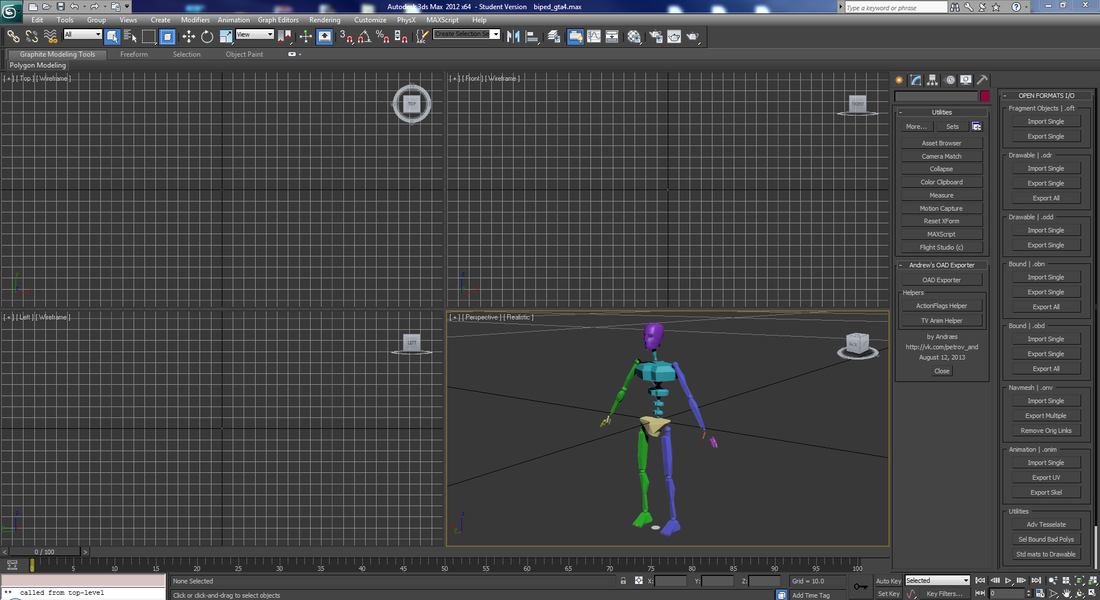
When you open it, it should look something similar to this (Depending on your 3ds Max version)
Creating A Char Bone Selection Macro Button
Before we do any animation, we will want to create a little button that will select the char bone, because trust me, you will need to select that annoying little bone located under the pelvis a whole lot.
Go up to MaxScript and click on 'New Script'
Go up to MaxScript and click on 'New Script'

Now you will get a notepad like window popup like this
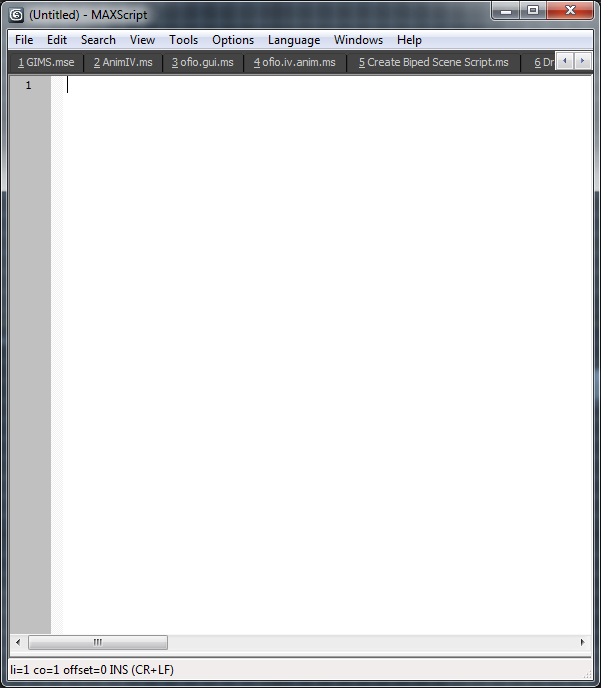
In here, you will want to type the following:
This in English is:
If an object in the scene with the name of 'char' is not equal to undefined (exists) then select it, but if it doesn't exist, display a message-box saying so.
Now you can save the script if you want to create a script file (.ms), or you can select all the code and drag it to the top menu like so: Gif Image: https://i.imgur.com/rtz2OtK.gif
Or static screenshot:
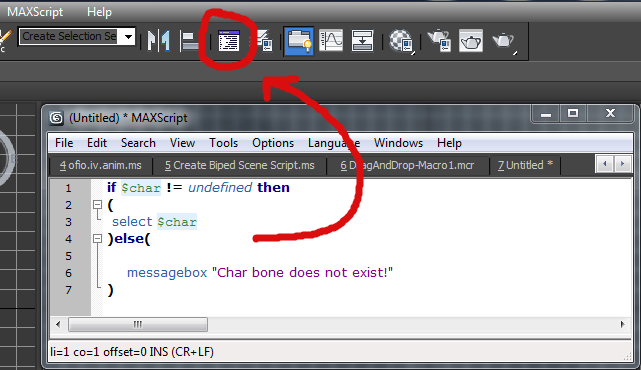
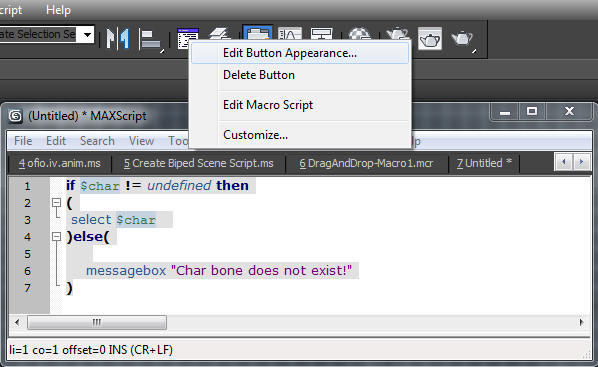
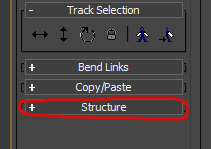
After you drag your code onto the menu button bar at the top, 3ds Max will create a blue script box icon (Shown in the red circle).
Now right click that and hit 'Edit Button Appearance...'
Now right click that and hit 'Edit Button Appearance...'
Now, check 'Text Button' and give it the label of something small like 'Char Bone' and click ok at the bottom.
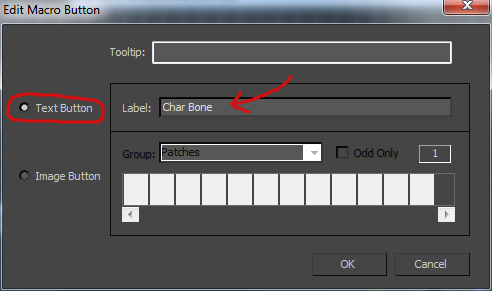
If you click your button with the biped open or an object with a sub object called char then it will select it and display a message if there is not.
Installing And Using 'RGS GTA IV Char Helper'
I have created a slightly bigger script that will set-up a biped scene that creates and freezes a floor plane, it also has a button to select the char bone.
If you want to try it, download it here.
I'm fairly new to Maxscript, so do expect bugs.
To install, just like before, you just drag the 'Scripts' folder into your main 3ds Max directory and merge/replace if prompted. eg: C:\Program Files\Autodesk\3ds Max 2012
If you want to try it, download it here.
I'm fairly new to Maxscript, so do expect bugs.
To install, just like before, you just drag the 'Scripts' folder into your main 3ds Max directory and merge/replace if prompted. eg: C:\Program Files\Autodesk\3ds Max 2012

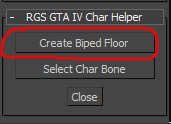
When you open 3ds Max now, in the utilities menu you will have a extra 2 buttons in a 'rollout'. You may have to scroll down to see them. (3 buttons in new version).
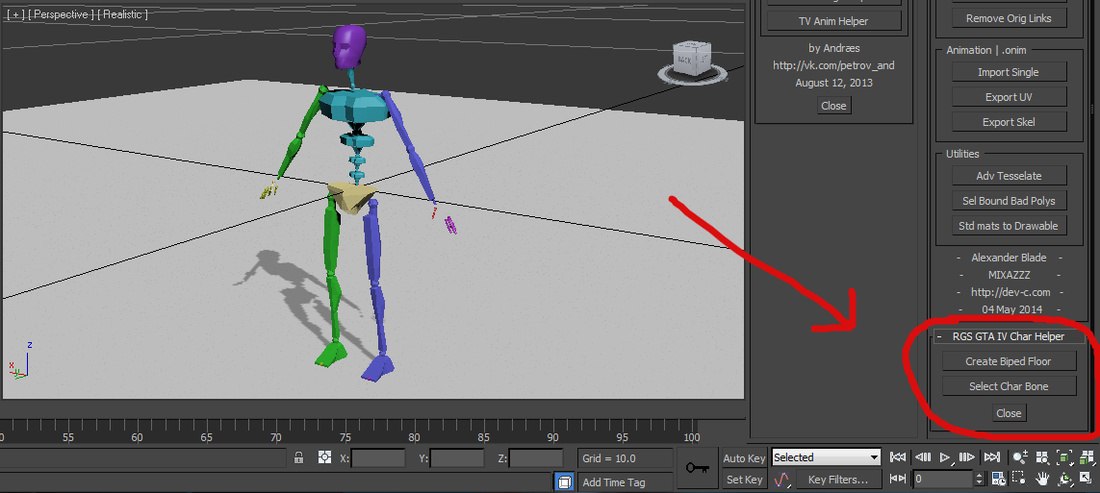
If you click 'Create Biped Floor', it will create the grey floor like above and freeze it.
If you click 'Select Char Bone', it will select the char bone of the biped.
If you click 'Select Char Bone', it will select the char bone of the biped.
Adjusting The Viewpoints
Ok, let's setup the viewports accordingly
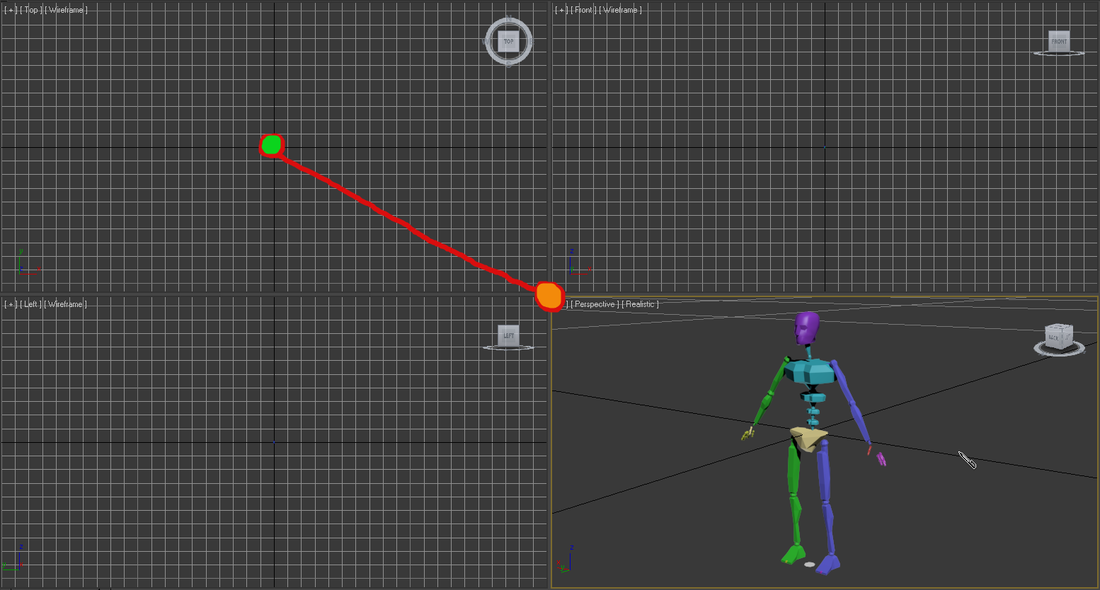
Drag the top-left corner of the perspective viewport from the orange to the green circle as shown above. This will provide a good balance of the viewports without losing any of them by maximising the perspective viewport with ALT+W
Now, if you downloaded it, press 'Create Biped Floor' in the 'RGS GTA IV Char Helper' and it will create the ground plane which you can use to reference as the floor of the game world.
Now, if you downloaded it, press 'Create Biped Floor' in the 'RGS GTA IV Char Helper' and it will create the ground plane which you can use to reference as the floor of the game world.
Shortcut Keys To Memorise
Lets zoom all the view ports to a helpful level. Select the part of the biped you want to animate or work on and hit the key Z twice. If you want to zoom around the general biped deselect everything and the hit Z, twice.
Few helpful singular hotkeys to know:
Z - Zoom object to viewport
H - Open 'Select by Name'
F - Front
L - Left
B - Bottom
T - Top
W - Move Tool
E - Rotate Tool
Q - Select Object (Q also cycles through methods of object selection)
R - Scale
P - Perspective View
U - Orthographic View
A - Angle Snap
G - Toggle Grid
X - Transform Gizmo Visible Toggle
N - Auto Key
Space - Selection Lock Toggle
and most of all, CTRL+Z (Combo, I know)
Setting Up The Biped
Ok, now lets find out how to setup the biped.
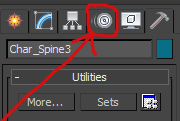
Select any part of the biped and go to the motion tab.
Select any part of the biped and go to the motion tab.
If you want to change the biped structure, such as to add artificial muscles, you can change it from 'Skeleton' to 'Male' by hitting Figure mode shown below
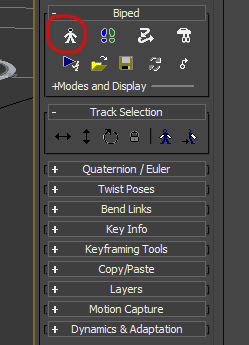
This will display amongst others, a new rollout called 'Structure', click on it.
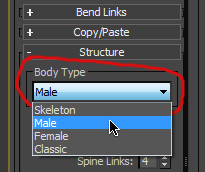
Now you should see 'Body Type'. This is where you can select what type of structure you would like for your biped
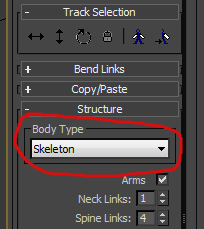
Select 'Male' if you wish to see a more human like model.
Remember this, you must not alter the biped when in 'Figure Mode' and to remember to exit out of figure mode after by un-checking it.
Remember this, you must not alter the biped when in 'Figure Mode' and to remember to exit out of figure mode after by un-checking it.
Key Types To Use
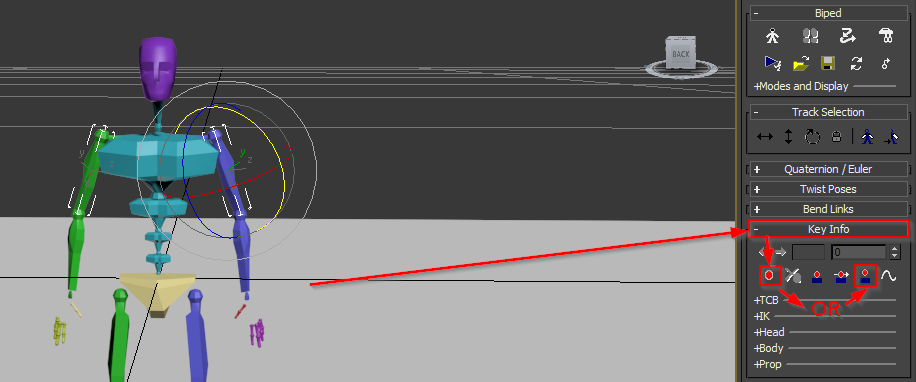
Ok, now open 'Key Info'
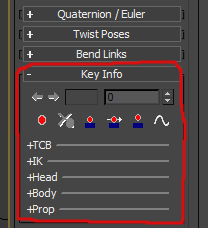
This is how you define the key type that you want to use
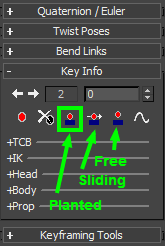
Planted - Key will try to remain in the position it was set, will resist being moved in the future, unless set to free key.
Sliding - Key similar to planted but a lot less strict and will 'go with the flow' and will change if it has to.
Free - Key is a standard key that will provide as the most clicked key. Used for moving/rotation char bones.
Sliding and Planted are used to 'fix' the bone that you set the key on. It is essential for doing squat like bends with the legs, where you don't want the feet going through the floor. You can just set a sliding key in each of the feet to anchor them in there position. All the connected bones or 'joints' will bend around them, giving them a realistic look.
Hard to explain, but Planted key is bothersome, remember that. I use the 'sliding key' and free key to 'avoid' problems.
Use the red circle underneath the left arrow to set keys of the chosen type. It essentially repeats the last chosen key type until the key type has been changed.
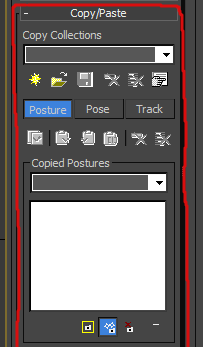
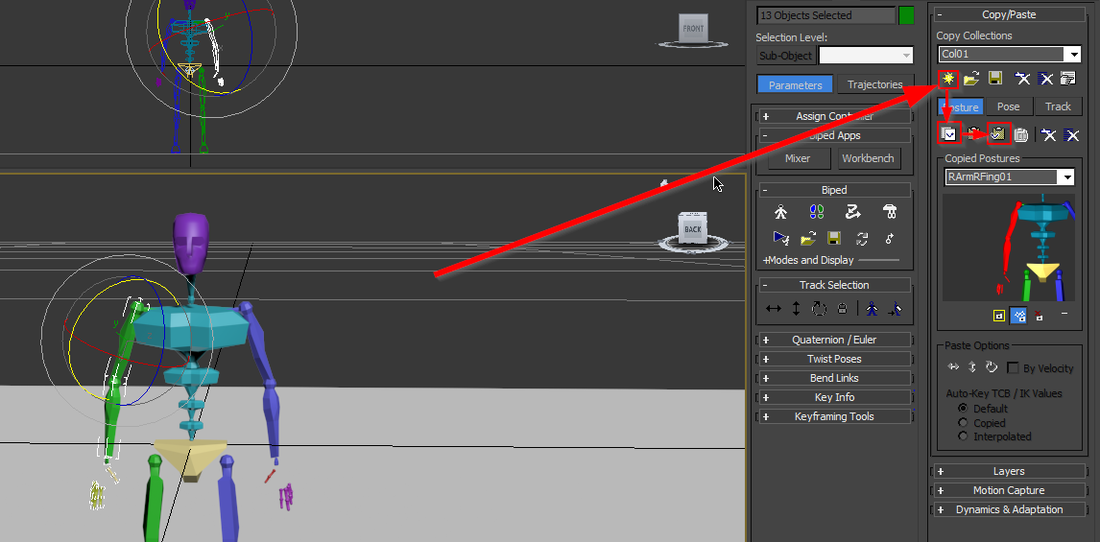
Creating & Copying Poses and Postures
When you are animating, you often need to do things on the other side the same. You may think you need to redo it manually to the other side, but that isn't the case. If you go to 'Copy/Paste' and click on the posture tab, you will be able to copy the posture and also paste it to the mirrored side of the biped.
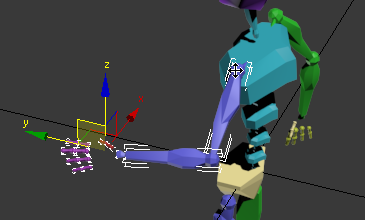
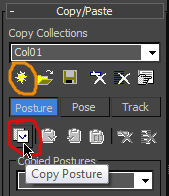
To copy a pose, click on the 'Create Collection' button indicated by the sun burst (next to the folder) to enable the copy button. Now, because all the bones all linked we can can double click a parent bone to select all of it's children too. Say I want to copy the entire right arm, I would double click the right shoulder like so...
Now, go back to 'Copy/Paste' and click on copy posture indicated by the red circle
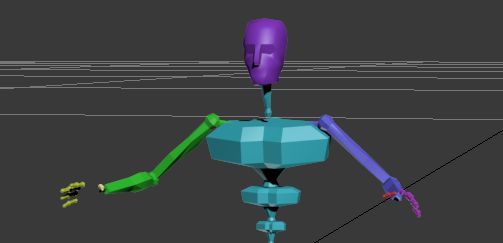
You will get a preview indicated in red to show you your selection. To copy to the other arm, simply click on the 'Paste Posture Opposite' button.
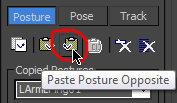
You will now see that you have successfully copied the right arm posture to the opposite side.
The 'Copy Pose' is more or less the same apart from the fact is copies everything, the whole stance. It will also show you a selection of the biped in red.
Just like we did with the 'Posture', 'Create Collection' then simply hit 'Copy Pose' this time. Then you can click on 'Copy Pose Opposite' which basically inverts the whole body, legs and everything. This is useful for doing animation on one side then the other and then looping that. An example would be for punching, kicking and dancing.
It can also be used for creating loopable animations, where you would go to your first key frame, then click 'Copy Pose' and then go to your last key frame and click 'Paste Pose', so it ends on the same pose as it began and therefore looping is seamless. If you have moved your biped's actual 'Char' position then don't just copy the original key frame by shift-dragging it to the end, but rather, use this copy/paste pose function, because if you don't, it would slide your biped back into its starting position. (Not to be confused with 'no animation flags' in the scripthook.net script).
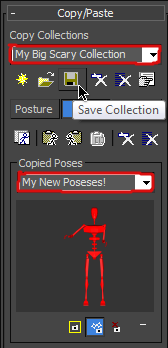
You can actually save your poses for use another time by giving your collection a name and then naming your pose appropriately. Then just click the 'Save Collection' button indicated by the floppy disk. You can load your saved poses by clicking the 'Load collections' button shown as a folder next to the floppy disk.
Just like we did with the 'Posture', 'Create Collection' then simply hit 'Copy Pose' this time. Then you can click on 'Copy Pose Opposite' which basically inverts the whole body, legs and everything. This is useful for doing animation on one side then the other and then looping that. An example would be for punching, kicking and dancing.
It can also be used for creating loopable animations, where you would go to your first key frame, then click 'Copy Pose' and then go to your last key frame and click 'Paste Pose', so it ends on the same pose as it began and therefore looping is seamless. If you have moved your biped's actual 'Char' position then don't just copy the original key frame by shift-dragging it to the end, but rather, use this copy/paste pose function, because if you don't, it would slide your biped back into its starting position. (Not to be confused with 'no animation flags' in the scripthook.net script).
You can actually save your poses for use another time by giving your collection a name and then naming your pose appropriately. Then just click the 'Save Collection' button indicated by the floppy disk. You can load your saved poses by clicking the 'Load collections' button shown as a folder next to the floppy disk.
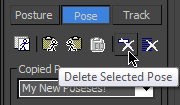
Any time you copy a pose, it is automatically added into the collection that you had to create in order to copy/paste poses. If you want to delete poses, just click on 'Delete Selected Pose', same exact thing for postures, but with 'postures' in place of 'poses' respectively.
Moving/Rotating The Biped's Overall Position
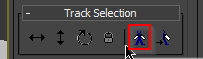
When animating, if you want to move the actual biped's position, you need to move the biped char bone. Go to Track Selection'...

Use the vertical or horizontal move tool indicated inside the red square to move the biped and use the rotation tool on the right to rotate the biped in in any direction you like.
You can use the 'Symmetrical' button to select the mirrored bone, so when you move/rotate the bone you selected, it will do the same on the other side.
You can use the 'Symmetrical' button to select the mirrored bone, so when you move/rotate the bone you selected, it will do the same on the other side.
You can see below that is does the same on the right
Finally, Lets Animate!
Ok, you made it to the animation part of the tutorial.
What we will be doing making a simple jump animation.
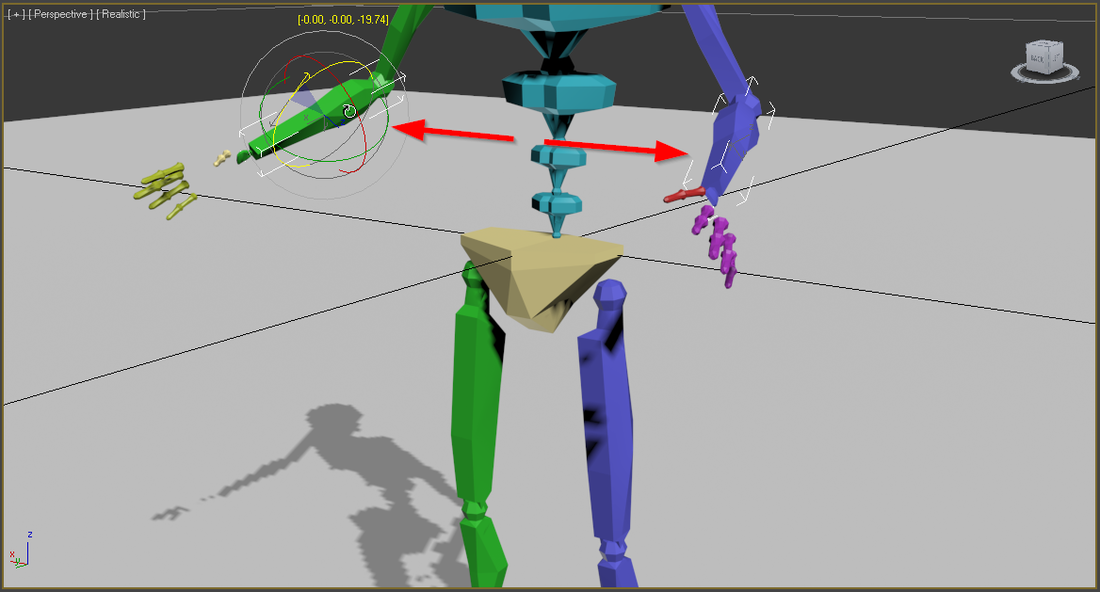
The first thing you want to do is set the starting position of your animation, so use the rotate tool and move tool to get the position you want to start from. Remember, if you find that you cannot rotate/move a joint, look at your own equivalent joint and see what you can rotate and what you can't. Professional animators often film themselves doing the movement they want to animate, so they can reference something real, and not assume what it should like.
I often try to rotate the forearm, but cannot because I am trying to rotate it in a direction not humanly possible. I should in fact be rotating the upper-arm, not the forearm.
Use a video on YouTube of someone jumping and copy exactly what he/she does to make it look realistic. You can use http://www.pausehouse.com/ to go frame by frame or in slow motion.
Ok, so I will set only one half of the body and then use 'Copy Posture' to do the other side.
I rotate the left arm to the position I want to start in.
What we will be doing making a simple jump animation.
The first thing you want to do is set the starting position of your animation, so use the rotate tool and move tool to get the position you want to start from. Remember, if you find that you cannot rotate/move a joint, look at your own equivalent joint and see what you can rotate and what you can't. Professional animators often film themselves doing the movement they want to animate, so they can reference something real, and not assume what it should like.
I often try to rotate the forearm, but cannot because I am trying to rotate it in a direction not humanly possible. I should in fact be rotating the upper-arm, not the forearm.
Use a video on YouTube of someone jumping and copy exactly what he/she does to make it look realistic. You can use http://www.pausehouse.com/ to go frame by frame or in slow motion.
Ok, so I will set only one half of the body and then use 'Copy Posture' to do the other side.
I rotate the left arm to the position I want to start in.

Now double click the parent of the arm bones, in this case the shoulder. Then go to Copy/Paste > Create Collection (if not already done) > Copy Posture > Paste Posture Opposite.
You can see that it has done the exact same on the opposite arm.
Now, lets anchor the feet because he will immediately bend his legs like a spring to generate thrust.
Select both feet by shift clicking and make sure you are at the first frame.
Now, lets anchor the feet because he will immediately bend his legs like a spring to generate thrust.
Select both feet by shift clicking and make sure you are at the first frame.

Then go to 'Key Info' and set a 'Sliding Key', remember?
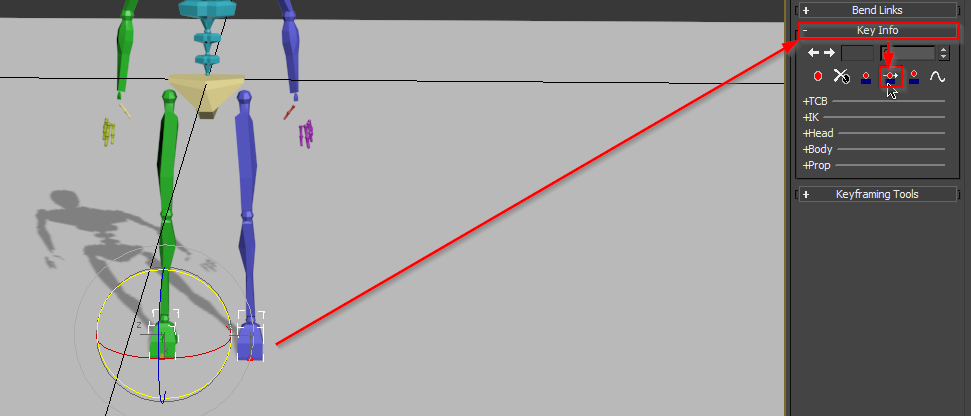
After you do this, you will have a small red square on each of the feet indicate that they have received a 'fix/anchoring key'.
OK, this will be my start position.
Remember! We need to set a initial key for both of the arms, so go to 'Key Info' again and set a initial key. We don't need to select all of the bones this time because we are only copying postures and the bones are all linked anyway.
OK, this will be my start position.
Remember! We need to set a initial key for both of the arms, so go to 'Key Info' again and set a initial key. We don't need to select all of the bones this time because we are only copying postures and the bones are all linked anyway.
After doing that you are all ready to start adding more keyframes. Now enable autokey by hitting 'N' or pressing autokey at the bottom.
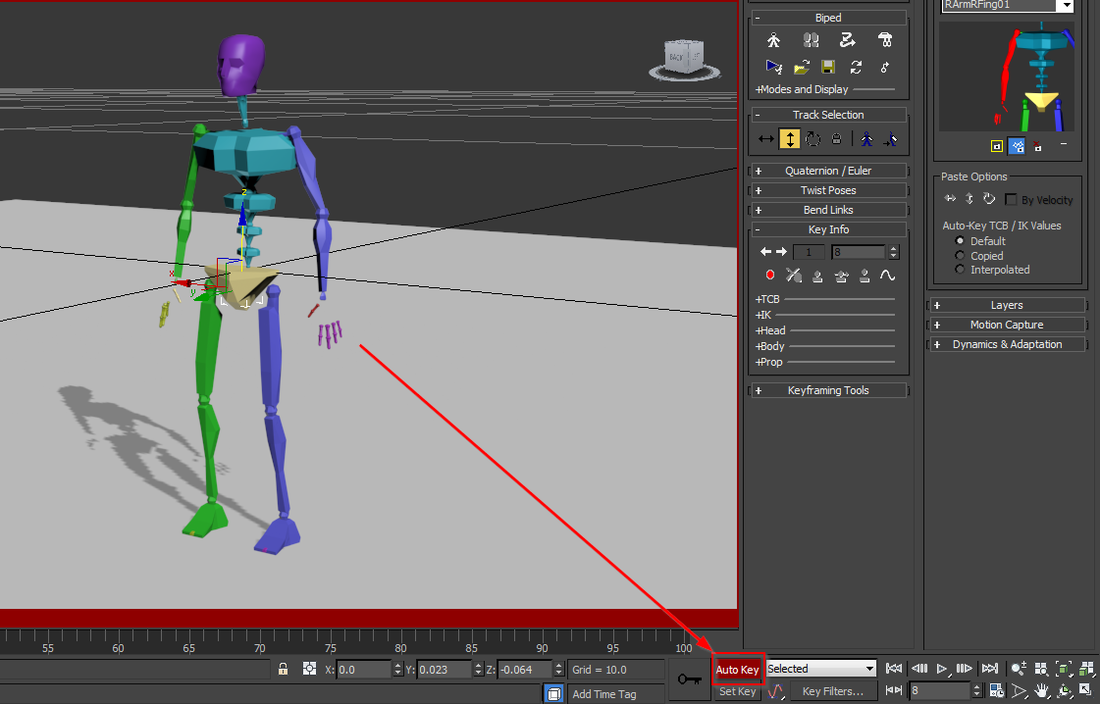
So, move the time/frame indicator to a about frame 8, this seems like good amount.

Then we want to bend the legs, so I will go to 'Track Selection' and select the vertical move tool. 'Body Vertical'.

Now I can drag the 'Z' down towards the ground. You will notice the feet are staying exactly where they were and the knees are bending around it.
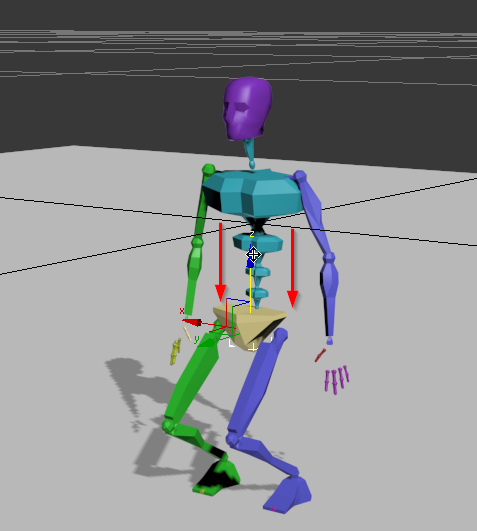
It will have set a keyframe automatically thanks to 'autokey' being enabled.
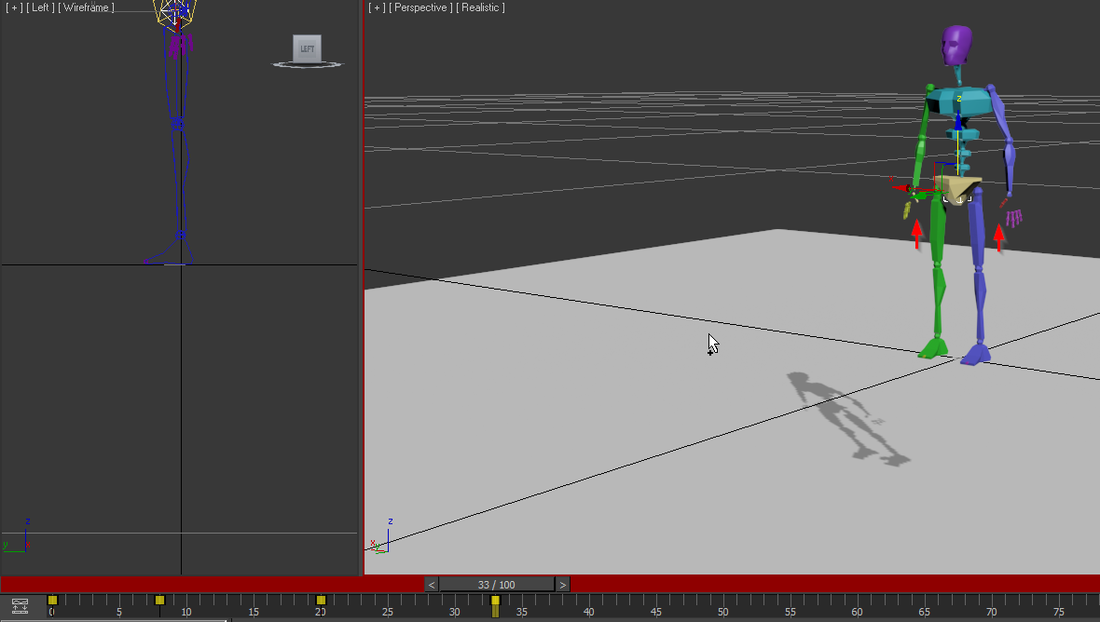
Move the frame indicator to about 20 or so and drag the biped up on the 'Z axis' to the height you want him to stop travelling up.
Move the frame indicator to about 20 or so and drag the biped up on the 'Z axis' to the height you want him to stop travelling up.
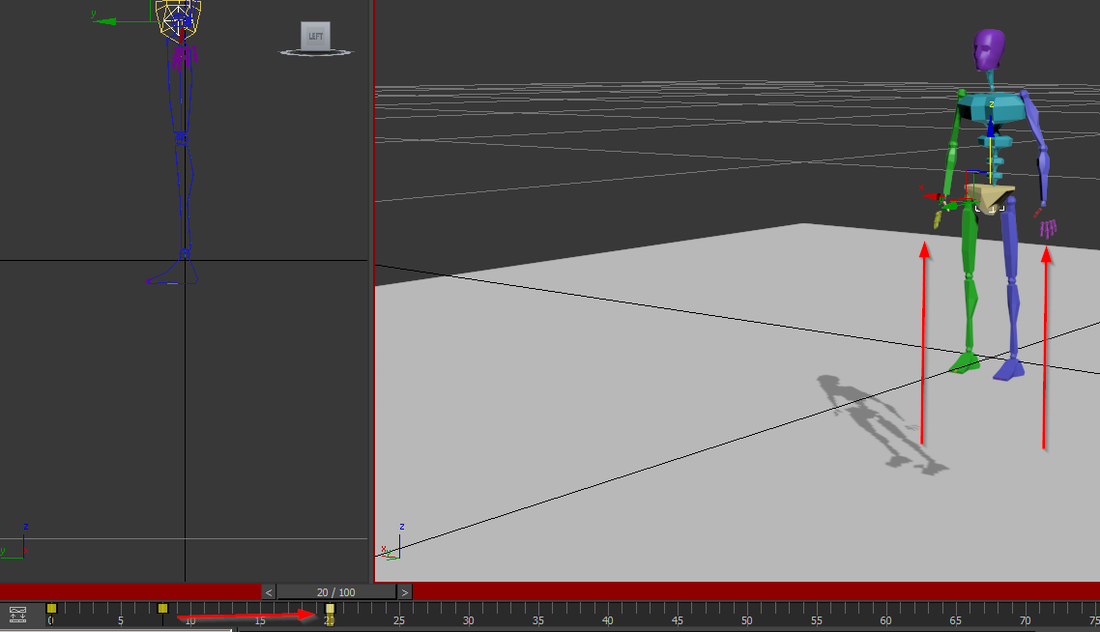
In real life, when you jump you would reach a point where you would start slowing down before you start falling again so move time time indicate a decent amount of frames, say 15 frames and move the biped up a very small amount. This would be our 'easing'. You can most likely do this with the curve editor, but I have some issues with mine.
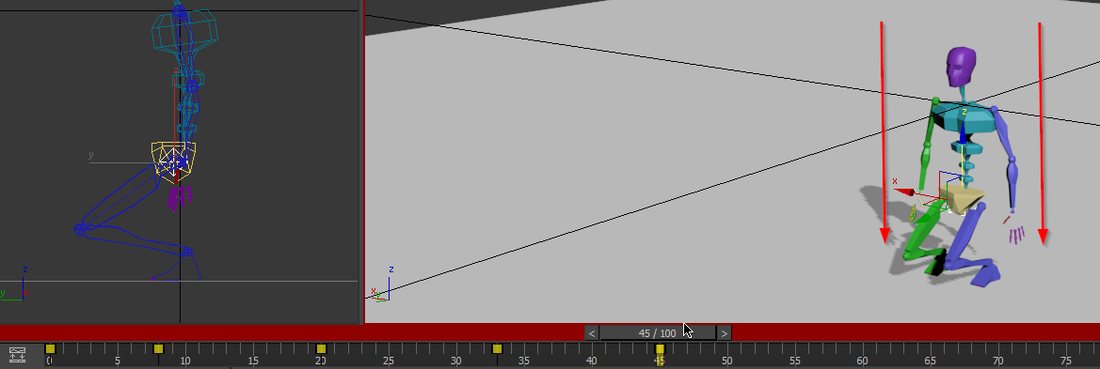
Now move 10 or so frames along and drag the biped down to the ground and push him down so his legs bend again. This will give the impression that his legs are absorbing the force/impact. He is also more likely to fall faster than he is to jump up because of gravity, so that is why I use something small like 10 frames.
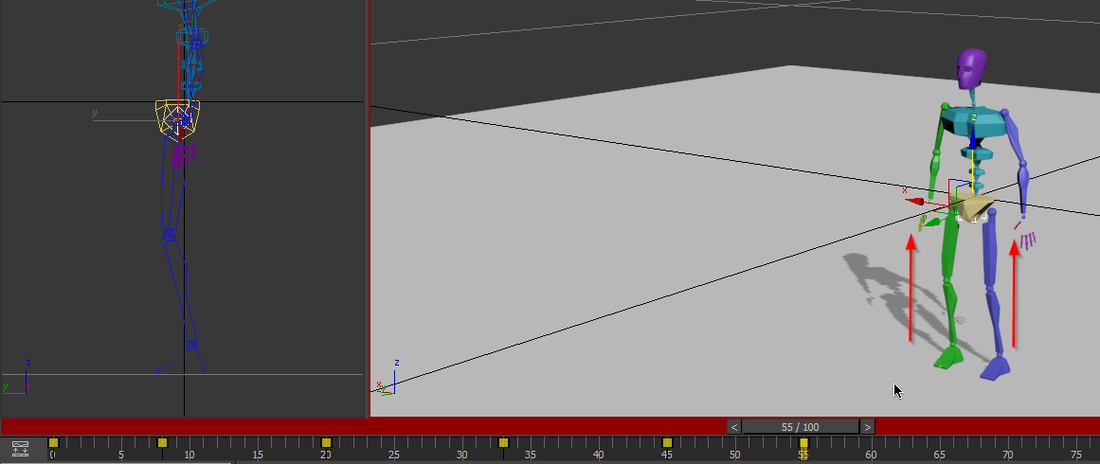
Now move along about 10 again and drag up so his legs are almost straight.

Like before we want to add a easing keyframe to slow him down into standing straight, so move about 8-10 frames and move him up ever so slightly.
This completes the jump, but everything else is static. When we jump, pretty much every bone/joint is moved/rotated. We haven't even looked at the arms, head, spine, pelvis or hands. The more you move, the better your animation will look.
Also, normally when the feet reach there extents and cannot anchor on to the ground any more, you will want to release the sliding key and add a 'free key'. It isn't much of a problem here because we aren't doing to much.
I will show what you should do anyway.
Select both of the feet and then as soon as the feet leave the ground, then go back a frame or so until they are back on the ground and set another 'sliding key' so that it stays fixed for that duration, then move along one frame and set a free key.
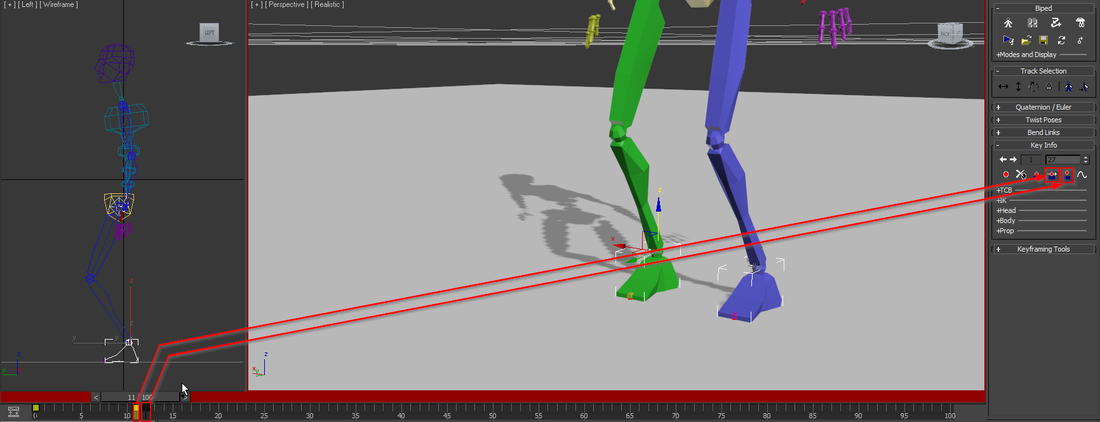
Now they detach when they should.
Do this in reverse for when the biped lands. You will need to add another 'free key' then move one frame after and set it back to a 'sliding key'.
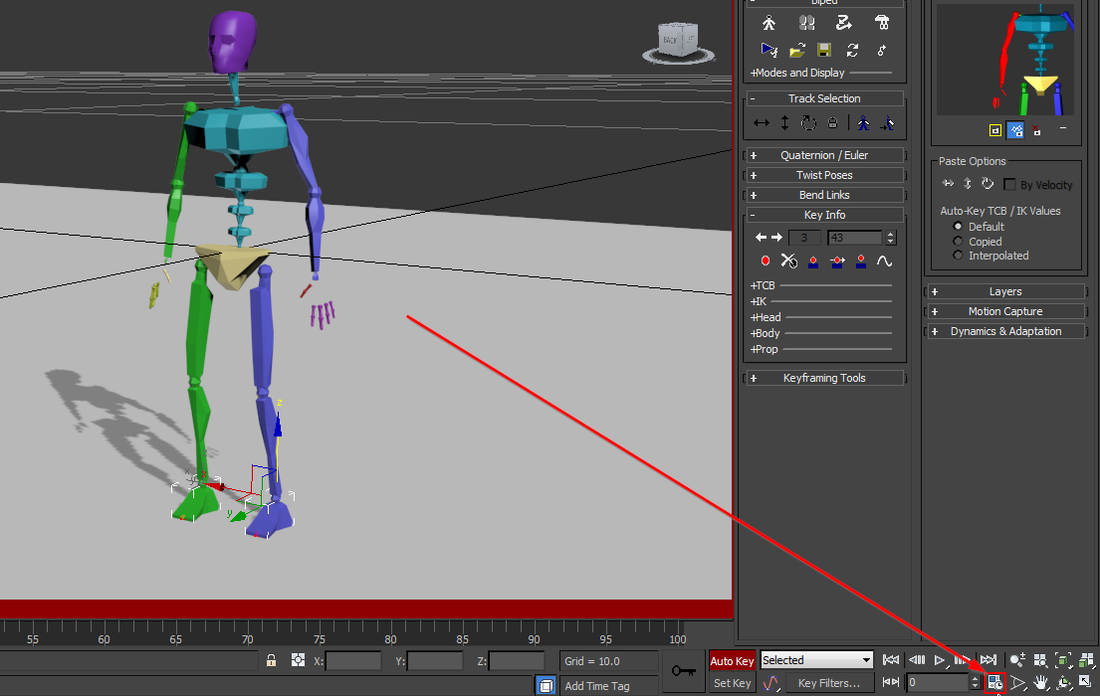
Sometimes, you will run in to a problem when the foot never actually touches the ground, the frames are sort of 'out of sync', so you can either increase the fall keyframe gap or you can drag the biped char bone down so they are touching the ground when they should. This will avoid the biped from fixed in a 'hovering' state. Just try a play around with until it looks correct. If you increase the gap that will increase the amount of 'steps' the animation has between each key. That, or you can double the FPS by doing the following...
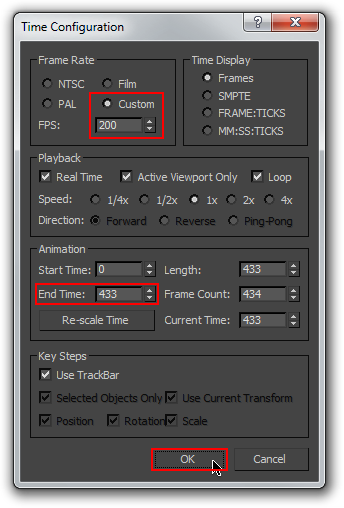
Click on 'Time Configuration'.
Do this in reverse for when the biped lands. You will need to add another 'free key' then move one frame after and set it back to a 'sliding key'.
Sometimes, you will run in to a problem when the foot never actually touches the ground, the frames are sort of 'out of sync', so you can either increase the fall keyframe gap or you can drag the biped char bone down so they are touching the ground when they should. This will avoid the biped from fixed in a 'hovering' state. Just try a play around with until it looks correct. If you increase the gap that will increase the amount of 'steps' the animation has between each key. That, or you can double the FPS by doing the following...
Click on 'Time Configuration'.
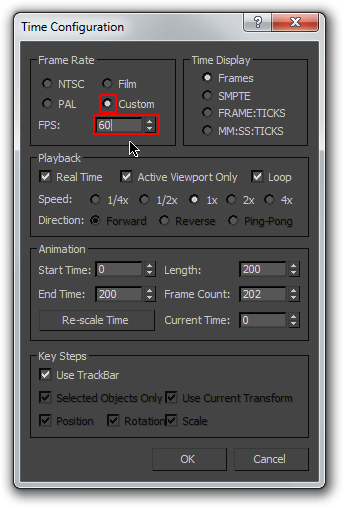
Then change 'Frame Rate' to custom and double what you have, so if you had 30 (default), make it 60, then hit OK.
Now, you should find you have more increments between each key, so you are much more likely to havethe feet touch the ground plane at some point instead of jumping/skipping past.
However, if this wasn't a problem, there is no need to change this.
This is our very basic animation so far with only the legs animated: http://i.imgur.com/tueB1le.gif
As I said before, there is a lot more things that go into an animation to make it look good, so try and animate as much as you can. Remember, you need to set initial keys or you won't be happy with the results.
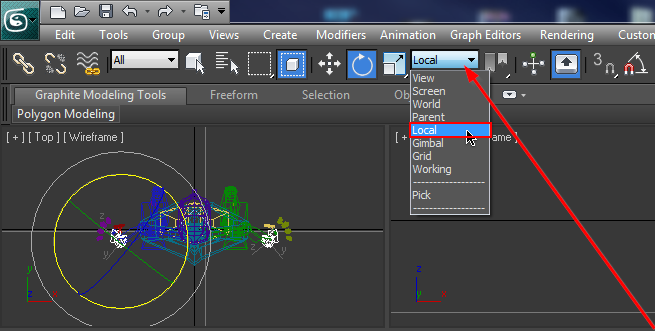
Also, remember that if you cannot rotate a bone exactly like you want, change the coordination system to 'local'. This means it will rotate the object relative to it self. Never put it on 'World' when working with bones/joints.
However, if this wasn't a problem, there is no need to change this.
This is our very basic animation so far with only the legs animated: http://i.imgur.com/tueB1le.gif
As I said before, there is a lot more things that go into an animation to make it look good, so try and animate as much as you can. Remember, you need to set initial keys or you won't be happy with the results.
Also, remember that if you cannot rotate a bone exactly like you want, change the coordination system to 'local'. This means it will rotate the object relative to it self. Never put it on 'World' when working with bones/joints.
Here is the final animation and what it looks like with various other bones animated: http://i.imgur.com/q7rzt6y.gif
You can see it is better, but no where near perfect, for one, it is way to slow, we can make it faster easily by using 'Re-scale time'.
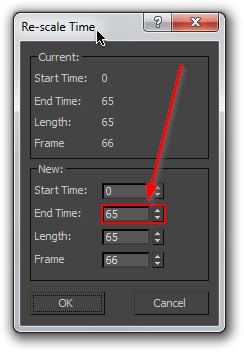
Like before, go to 'Time Configuration' > 'Re-Scale Time' and reduce the end time or length by 1/4 or so. If you have 100, make it so 75 or even try 65 as 75 still seems a bit slow. Click OK then review the animation.
You can see it is better, but no where near perfect, for one, it is way to slow, we can make it faster easily by using 'Re-scale time'.
Like before, go to 'Time Configuration' > 'Re-Scale Time' and reduce the end time or length by 1/4 or so. If you have 100, make it so 75 or even try 65 as 75 still seems a bit slow. Click OK then review the animation.
Better! Now let's see what we have: http://i.imgur.com/oTwTYn2.gif
I didn't use a reference when doing this animation and you can clearly see that. If I had gone frame by frame of a real jump I can see exactly what I should be animating.
That's it for the animating, now we need export this biped animation to a .fbx file so that we can import on top of the GTA IV skeleton.
Exporting Your Animation To .FBX
If we want to export our animation we should cut out any blank frames. We can see what the blank frames are by pressing CTRL+A to select everything. This will combine all of keyframes of all the different bones and show them all on the timeline. Obviously the last one on the right will be the end of the last animation. Anything after that will be blank and nothing will be going on.
Make a note of the frame on which the last key is on, then open 'Time Configuration' again and set 'End Time' to that frame.
Once you have done that, we can export.
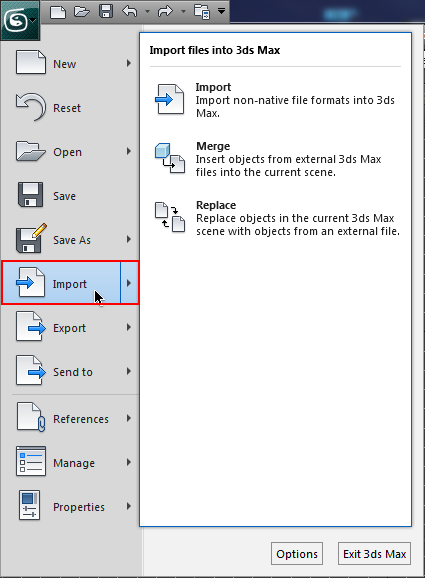
Go up to 3ds Max logo (File), at the top left and press on export.
Make a note of the frame on which the last key is on, then open 'Time Configuration' again and set 'End Time' to that frame.
Once you have done that, we can export.
Go up to 3ds Max logo (File), at the top left and press on export.

Before you export, I highly recommend you create a folder structure for convenience and organisation like so...
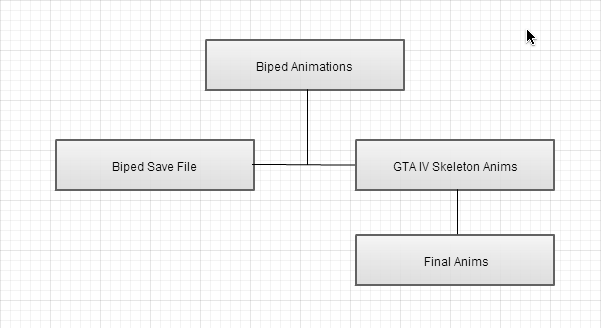
Once you have done that, save your .fbx in 'Biped Animations', (the parent folder). Don't forget to save the .max file too, so you can go back to the project if you animation turns out to look worse than you thought it would. Save that in 'Biped Save File' and remember to name it the same as your .fbx so you know which is which.
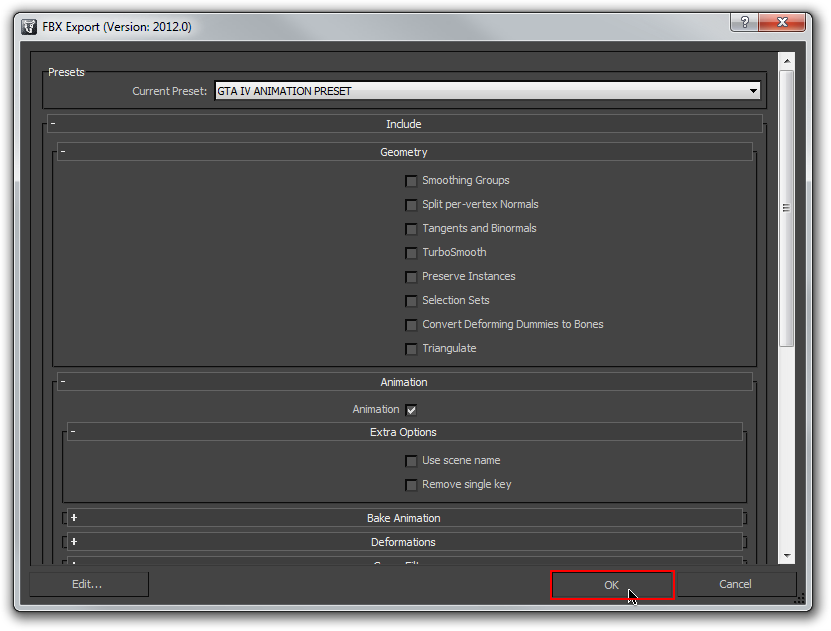
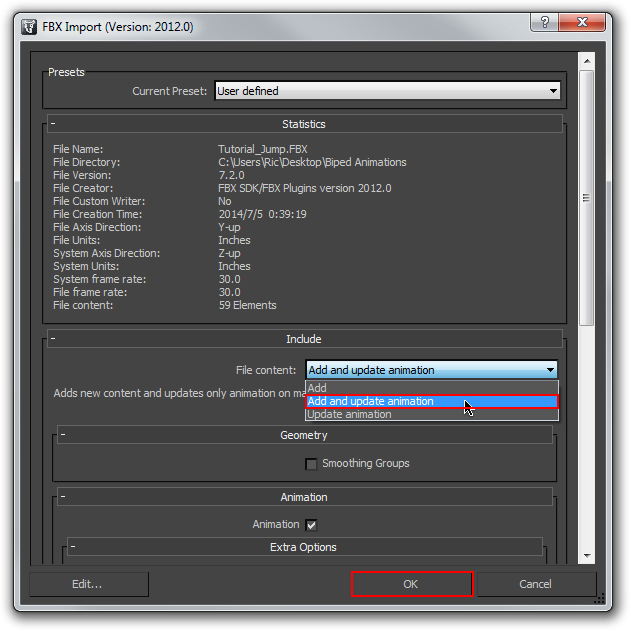
Once you save your .fbx file, you will get a box popup like this...
Once you save your .fbx file, you will get a box popup like this...
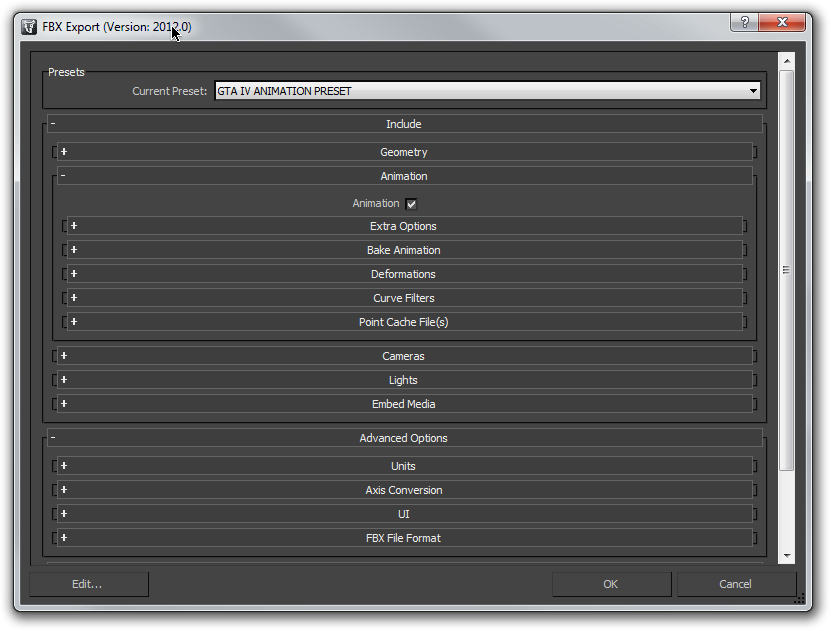
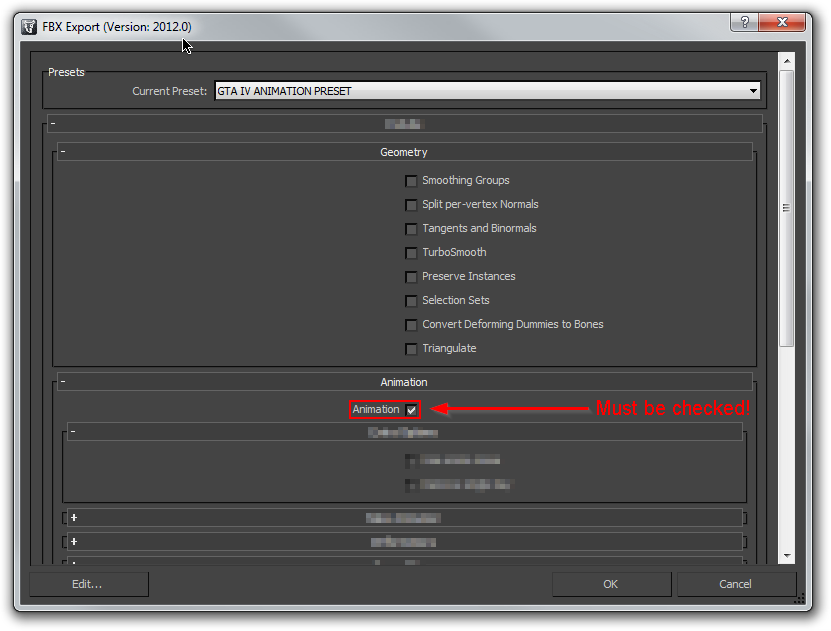
Copy the settings below...
Make a preset so you don't have to do this every time...
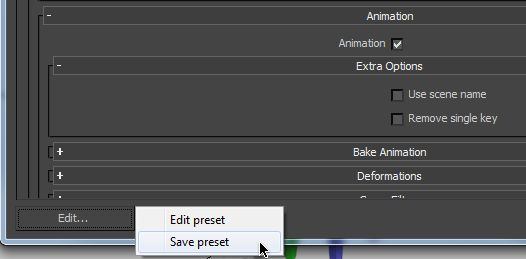
Give your preset a good name, so you will know which is which and what it is for...
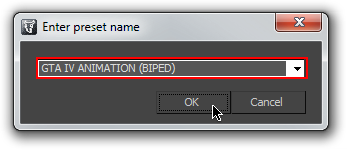
Click 'OK' then press OK to the main dialog.
If you get an error about geometry (plane001) then don't worry, it's because of the plane we made at the very start. Just ignore it, or delete the plane in future before your export the .fbx.
Importing .fbx Animation On To GTA IV Skeleton
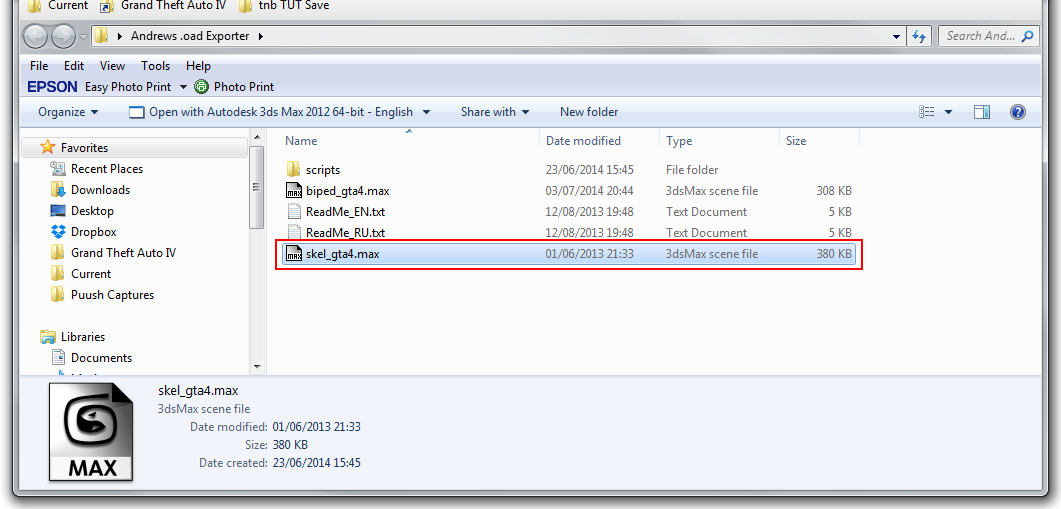
We need to import that .fbx file on top of a GTA IV skeleton, to do this, navigate to Andrew's OAD Exporter folder and open skel_gta4.max.
When it opens you will get a message about 'Missing Dlls', just ignore it and press 'Open'.
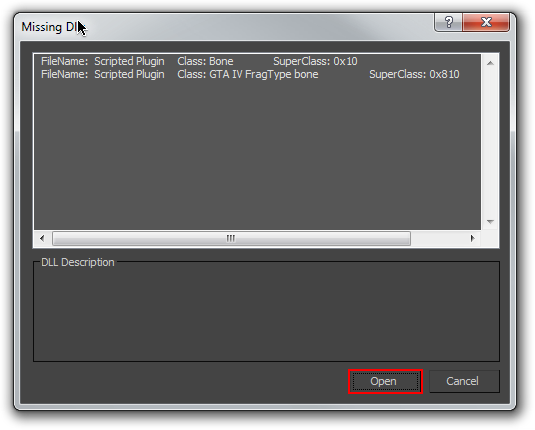
Now, you should see a colourful skeleton representing different bones.
Go straight to importing your animation by going to the 3ds Max logo (file) at the top left and click 'Import'.
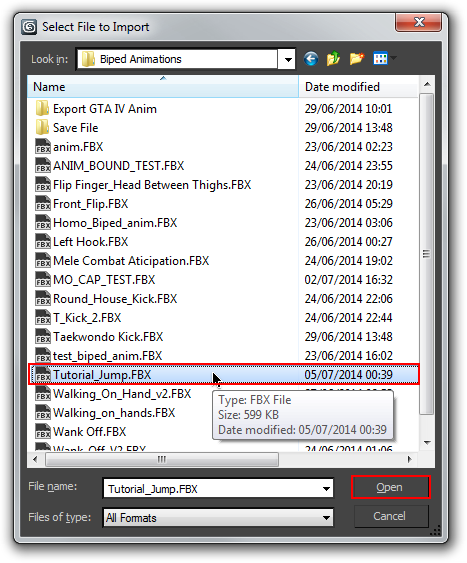
Navigate to the folder where you saved your .fbx file, so if you created the folder structure, then it would be in 'Biped Animations'. Select the file and press 'Open'.
Now you will be presented with this dialog. Make sure you select 'Add and Update Animation', press OK and let 3ds Max load the animation on top of the skeleton.
You will see that the skeleton is animated and that the plane is there too (If you didn't delete it), which is no big deal at all because Andrew's OAD Exporter or OFIO; which ever one you choose to use, will just ignore it.
Before, when we removed the blank frames I forgot to mention that when you open 3ds Max, the default frame range is 0 to 100, so we will have to set the last frame to 65 again, well 65 in my case.
As before, go to 'Time Configuration' and change 'End Time' to the last keyframe frame, in my case 65.
While you are there, set the FPS to 200, this will remove an issue we have with GTA IV anims, where they shake/flicker. It doesn't make the animation faster it just adds more frames. This will make the 'End Time' appear much higher, but don't worry, it is exactly the same, it is just relative to the FPS. Click OK when you are done.
Exporting The Final Animation To .onim
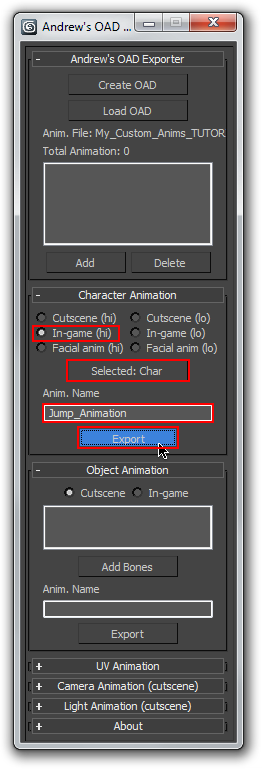
All we need to is open Andrew's OAD Exporter by going to utilities and then clicking 'OAD Exporter'.
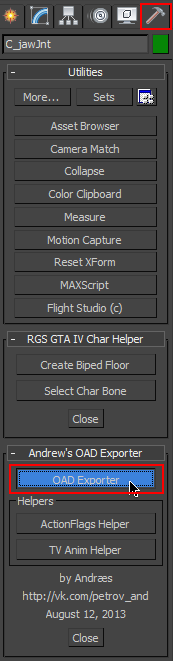
This box will popup on the left of your screen, since you are reading this tutorial, I gather you haven't exported an animation from Open IV in advance of this tutorial. So let's create a new OAD file, (the file that will reference your animation in Open IV). Click on 'Create OAD'.
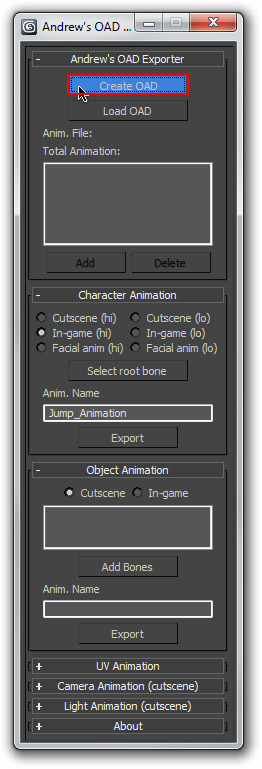
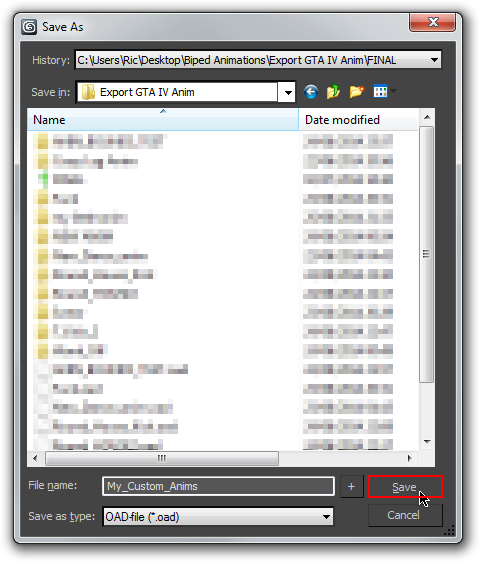
Now browse to the location where you created the folder like 'GTA IV Skeleton Anims' and give your OAD a name that means 'more that one' like: "My_Custom_Anims" because this file references a folder with multiple animations, not just one. If you already have .oad file, append new anims by selecting 'Load OAD' instead of 'Create OAD'.
Now all you need to do is save your actual animation. Do this by selecting 'In-Game (hi)', giving your animation a name and hitting 'Export' .
If you installed the fix I made that auto selects the char bone, you can just click 'Select Char Bone' and it will select it. If you didn't install it, press 'H' to bring up the 'select from screen' dialog and find 'Char' and select it. Then press 'OK' and go back to Andrew's OAD Exporter and press 'Select Char Bone'.
If you installed the fix I made that auto selects the char bone, you can just click 'Select Char Bone' and it will select it. If you didn't install it, press 'H' to bring up the 'select from screen' dialog and find 'Char' and select it. Then press 'OK' and go back to Andrew's OAD Exporter and press 'Select Char Bone'.
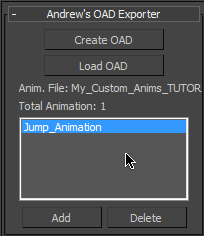
You'll know if your animation exported successfully if get's added to the listbox, otherwise you'll get a error with a loud tone. The export in my case when smoothly.
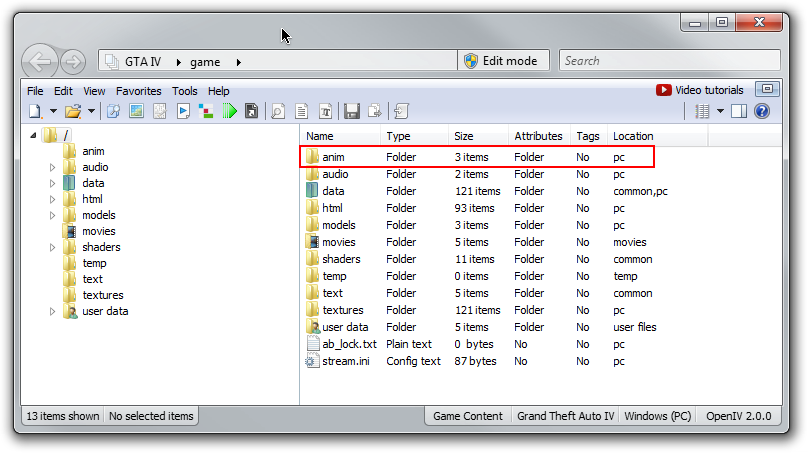
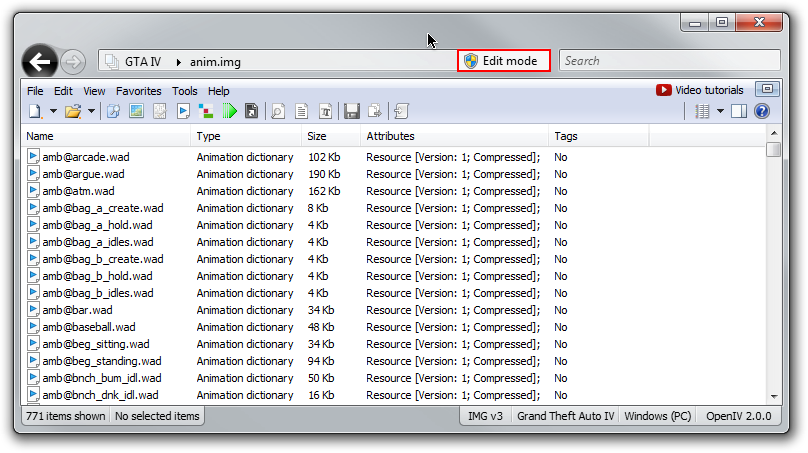
Now, launch OpenIV and go into 'Anim'.
Then go into 'anim.img'.
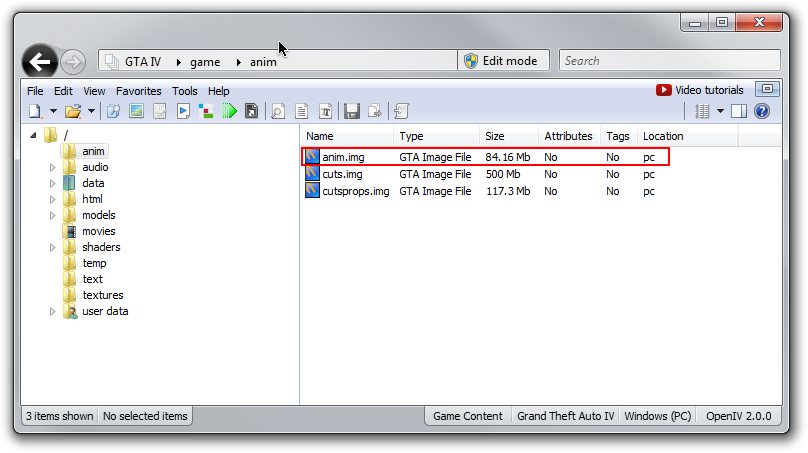
Enable 'Edit' mode.
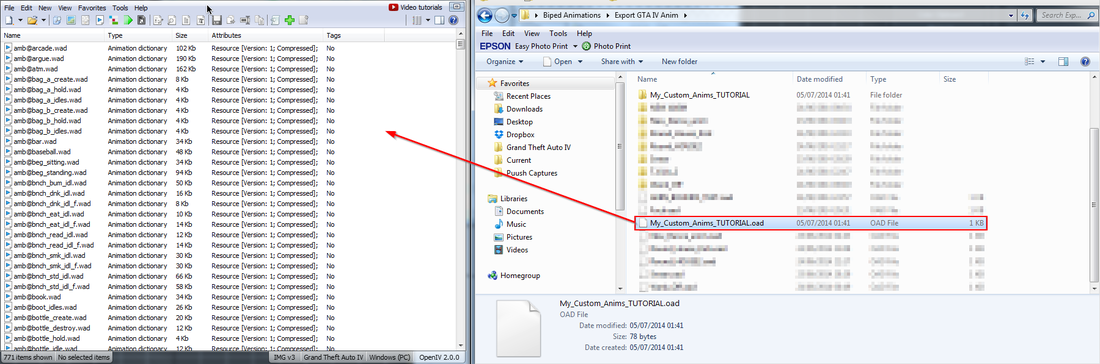
Now you need to navigate to the folder where you exported your .oad and .onim. Drag the '.oad' only into OpenIV.
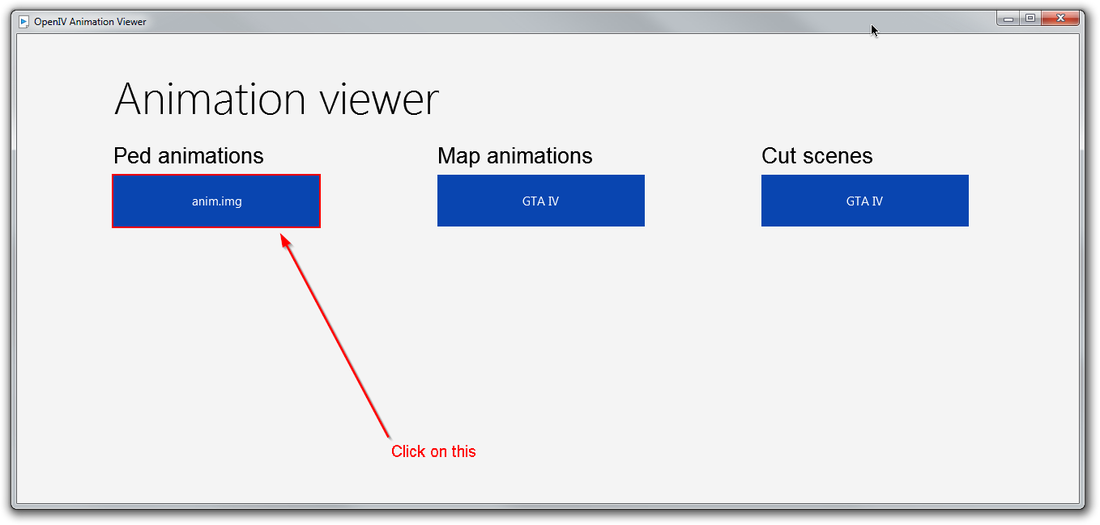
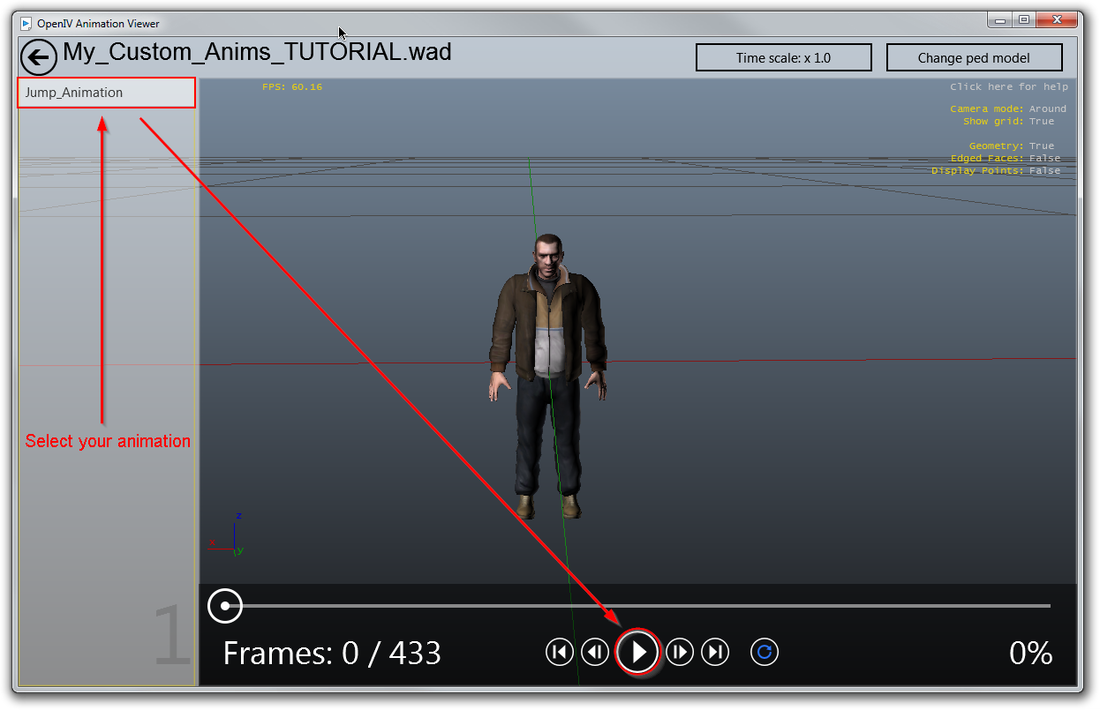
If everything is correct, there should be no errors. To review your animation, in OpenIV, go to 'Tools' > 'Animation Viewer' > 'anim.img'.
Then search for what you called the .oad file and click on the button.
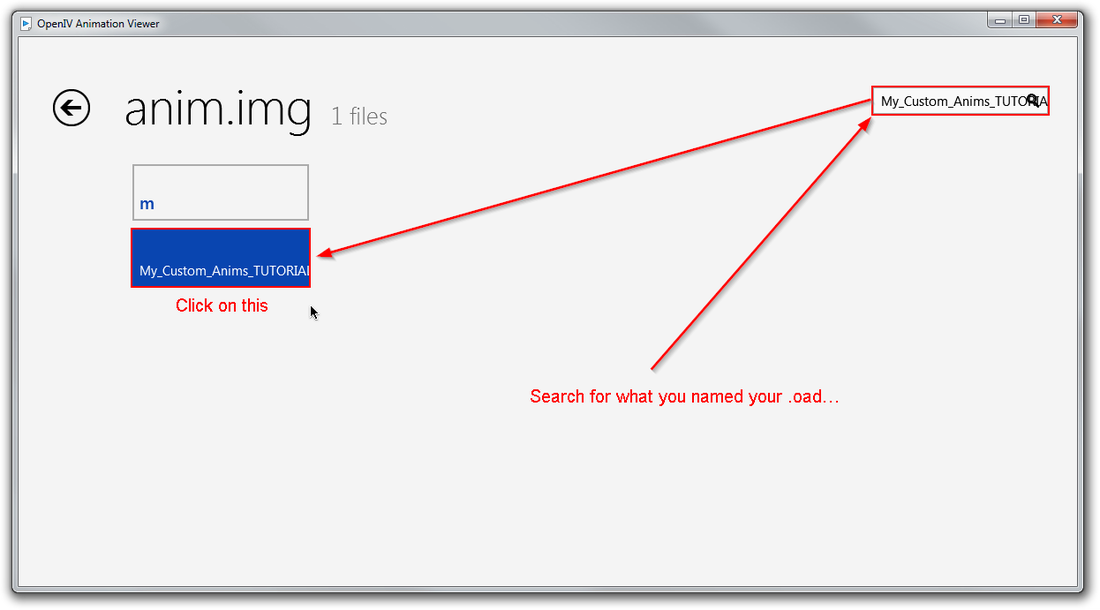
Select your animation and press play!
I hadn't animated the fingers or wrists and the arm rotation is a bit bad. But you can see the animation plays OK.
Here is a Gif image of it: http://i.imgur.com/agEaaPn.gif
I hadn't animated the fingers or wrists and the arm rotation is a bit bad. But you can see the animation plays OK.
Here is a Gif image of it: http://i.imgur.com/agEaaPn.gif
Now you should know how to create custom animations for GTA IV.
If you got this far, well done! Please tell me!
Thanks for reading.
Download Tutorial Files
If you got this far, well done! Please tell me!
Thanks for reading.
Download Tutorial Files
Author: Riccardo Geraci
